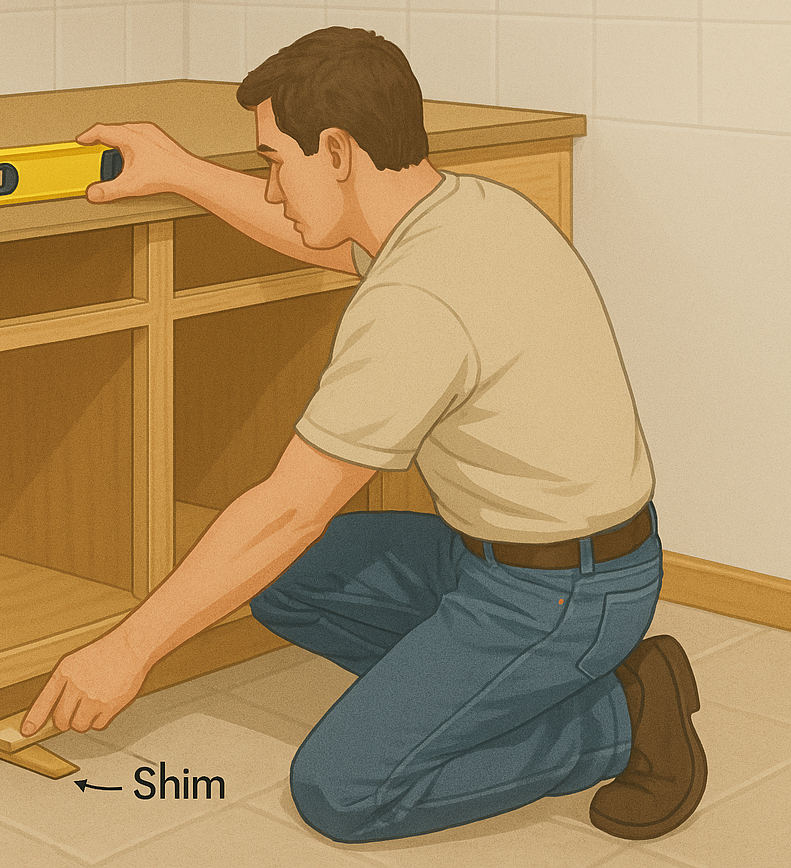
Even the most carefully measured kitchen can go off track without proper shimming. A slightly uneven floor or a twisted cabinet box can cause crooked doors, tight drawers, and countertops that never sit quite right. Shimming ensures every base cabinet sits perfectly level and true, so appliances slide in easily and every reveal looks clean.
Follow this step-by-step guide to achieve a professional cabinet installation using composite and hardwood shims from WoodworkerExpress.com.

Quick Summary Table: How to Shim Cabinets
| Category | Details |
|---|---|
| Goal | Level and align base cabinets for clean, professional installation |
| Key Tools | Level (6–8 ft), laser line, ledger board, clamps, drill, tape measure |
| Materials | Composite and hardwood shims, screws, construction adhesive |
| Best Shim Types | Composite (moisture-resistant) · Hardwood (load-bearing) |
| Checkpoints | 1. Find floor high spot 2. Shim in pairs 3. Recheck every few boxes 4. Verify appliance clearances |
| Ideal Tolerances | Flat within 1/8 in. over 10 ft · Level within ±1/16 in. over 6 ft |
| Pro Tip | Always pin or glue shims before fastening to prevent shifting |
| Shop Now | Buy Shims at WoodworkerExpress.com → |
Step 1: Find the High Spot
Always start by identifying the highest point of the floor. This point determines your finished cabinet height and ensures you never run out of clearance under the countertop.
- Sweep the area clean.
- Run a 6- to 8-foot level or straightedge along the wall.
- The first place it rocks or touches is your high spot—mark it on the floor and up the wall.
- From that mark, measure up 34½ inches for standard base cabinets (with a 1½-inch countertop).
- Snap a clean chalk or laser line across the wall. That line is your don’t-cross reference for the entire run.

Step 2: Hang a Ledger Board
Fasten a straight 1×3 ledger along your level line. The ledger supports your first few cabinets while you adjust them into position.
- Drive one screw near the center, align the board to the line, then fasten both ends.
- The ledger carries the cabinet weight and keeps the run aligned while you shim and fasten.
Step 3: Shim in Front-and-Back Pairs
Dry-fit the first two cabinets at the high spot. Clamp their face frames flush, then insert shim pairs—one at the back rail and one directly beneath the front stile.
- Bring the back to your reference line first, then match the front to eliminate twist.
- Re-check every few cabinets with your laser or long level to maintain a flat, even run.
Pro Tip: Use composite shims in wet zones (like under sinks) and hardwood shims under heavy points or cabinet legs. Both types are available at WoodworkerExpress.com.

Step 4: Fasten Carefully and Re-Check Often
Once everything is level, it’s time to fasten. The goal is stability without shifting your alignment.
- Clamp face frames tightly together.
- Pre-drill ⅛-inch pilot holes near hinge and latch rails.
- Drive cabinet screws until snug—never over-tighten.
- Pin or glue each shim before fastening to keep it from sliding.
- Re-check level after each box or wall section.
If something moves, back out a half-turn, adjust, and retighten. Small corrections now prevent major fixes later.
Step 5: Confirm Appliance Clearances
Before locking everything in, check that your openings match standard dimensions:
- Dishwasher: 24″ wide × 34–35″ high to underside of counter
- Range: 30″ wide × 36″ to cooktop height
- Refrigerator: 36″ wide × 70″ high with at least 1″ of space behind for ventilation
Keep your installation within ⅛ inch over 10 feet flatness and ±1⁄16 inch level over 6 feet. Proper clearances prevent binding, noise, and premature wear.

Step 6: Address Uneven Floors or Walls
If the floor slopes more than ¾ inch across the run, don’t chase every low spot—build a platform base or use adjustable cabinet levelers instead. They deliver precise height control and make toe-kick alignment easier.
For out-of-plumb walls, scribe fillers or use small spacers to maintain square cabinet boxes.
Step 7: Choose the Right Shim for the Job
| Material | Best Use | Watch-Outs |
|---|---|---|
| Composite | Kitchens, bathrooms, or damp areas | May squeak if unpinned on smooth floors |
| Hardwood | Heavy cabinets and load-bearing points | Avoid near sinks or wet zones |
| Stackable Levelers | Fast, tool-free adjustments on flat floors | Must be locked before fastening |
For moisture-prone installations, stick with composite shims—they won’t swell, rot, or compress under load.

Step 8: Verify Toe-Kick and Reveal Lines
Keep the toe-kick around 3½ inches high and recessed about 3 inches from the face. This clears shoe molding and allows comfortable standing space without doors hitting toes.
Mark a continuous toe-kick line around the room, then scribe to the floor where necessary for a clean, consistent reveal.
Step 9: Final Checks Before Countertop
Once your cabinets are aligned and fastened:
- Recheck the entire run for level and plumb.
- Test appliance openings with a dry fit or cardboard template.
- Tighten wall fasteners only after confirming reveals are even.
A quick re-check at this stage ensures your countertop will sit flat without gaps or “lippage.”

Why Shimming Matters
Shimming isn’t just about filling gaps—it’s about precision. Done right, it:
- Keeps doors and drawers square
- Prevents countertops from cracking
- Eliminates squeaks and racking
- Protects against moisture and movement over time
A few quality shims can save hours of frustration and costly callbacks.
Shop Shims at Woodworker Express
Professional installers rely on the right materials for lasting results. Find composite, hardwood, and stackable shims built for woodworking precision at WoodworkerExpress.com.
Make your next cabinet install faster, flatter, and perfectly aligned—starting from the ground up.


