A crooked door isn’t just annoying, it’s geometry gone wrong. If your hinge doesn’t match your cabinet construction, even perfect math won’t save your reveal.
Framed cabinets use a face frame as the hinge anchor. Frameless boxes mount hardware straight to the side panel. That difference changes overlay measurements, drilling positions, and adjustment limits.
Choose the wrong type, and what should be a ten-minute hinge swap turns into an hour of realignment.
1. Know Your Cabinet Construction
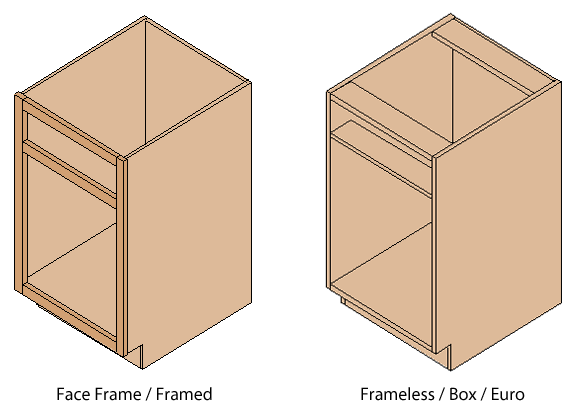
Face Frame Cabinets feature a front frame that narrows the opening. Hinges mount to this face frame, often with adapter plates or spacers.
Frameless Cabinets skip the frame; hinges mount directly to the cabinet side panel.
Why it Matters: Mount geometry defines where your overlay starts and how the door clears. Mismatch hinge style to box type, and you’ll fight misalignment every time.

2. Understand Overlay the Right Way
Overlay is how much the door covers the cabinet front.
- Face Frame: Measure from the face frame edge to the door edge.
- Frameless: Measure from the cabinet side to the door edge.
Example: For a 14-inch opening and a 15-inch door on a face frame, overlay = (15 − 14) ÷ 2 = ½ inch, plus about 1⁄16 inch reveal if desired.
Choose hinges labeled for that overlay, confirm cup depth fits your door thickness, and test with one door before drilling the rest.
Pro Tip: The wrong reference point leads to uneven gaps and doors that rub or hang proud.

3. Match the Hinge to the Mounting Style
| Cabinet Type | Hinge Mount | Key Hardware |
|---|---|---|
| Face Frame | To the face frame (with plate or adapter) | Face-frame hinge system |
| Frameless | Direct to side panel | 35 mm concealed hinge |
Frameless systems usually use a 35 mm cup bored 12–13 mm deep. Framed hinges need plate height and offset matched to your overlay target.
Why it Matters: The wrong mounting style throws off geometry and clearance, forcing redrilling or shimming.
4. Focus on the Three Critical Numbers
- Overlay – How much the door overlaps the cabinet.
- Cup Size – Standard 35 mm (26 mm for thin doors ≤ 15 mm).
- Opening Angle – Commonly 95°, 110°, 120°, or 155°.
Get these three right, and everything else—from reveal to swing—lines up naturally.
5. Run a Small-Scale Test
Inputs: cabinet type, door thickness, overlay, desired swing angle.
Steps:
- Drill one hinge cup on scrap or a test door.
- Mount hinge and plate.
- Cycle the door ten times.
Checks:
- Door clears edges by ~2 mm.
- Gaps stay even.
- Soft-close engages cleanly.
A single test door prevents whole-kitchen mismatches later.
6. Plan for Edge Cases
- Thin doors (≤ 15 mm): use shallow or 26 mm cup hinges.
- Thick doors (≥ 24 mm): verify arm and angle rating (120°+ recommended).
- Inset doors: require inset hinges or adapter kits.
- Older cabinets: check plate hole spacing—modern 32 mm patterns may not align.
Why it Matters: Anticipating exceptions saves patching and re-boring later.
7. The Reliable Default
For most kitchens:
- Hinge Type: 110° concealed soft-close
- Cup: 35 mm
- Overlay: ½ inch
- Door Thickness: ¾ inch
This setup balances clearance, quiet motion, and easy adjustment across most cabinet styles.
Final Thoughts: Face Frame vs Frameless Cabinet Hinges
Match the hinge to the cabinet body, not just the door style. Measure overlay from the correct reference point—face frame or panel edge. Confirm cup, plate, and opening angle before drilling all doors.
When mount geometry and hinge type agree, doors swing true, gaps stay even, and installation stays under ten minutes—every time.


