Staring at empty holes in your cabinet doors after removing old hardware? Don’t let those small circles stop your kitchen update. Many homeowners abandon hardware projects because they worry about visible repairs or think they need professional help.
Here’s the truth: filling cabinet hardware holes ranks among the easiest DIY fixes you can tackle. With the right materials and five simple steps, you’ll make those holes vanish completely—even you’ll forget they existed.
This guide walks you through the exact process professional cabinet makers use daily. Whether you’re switching from knobs to pulls or updating your kitchen style, these steps save hundreds compared to professional refinishing.
Ready to transform those eyesores into spotless surfaces? Let’s get started.

Step 1: Gather Necessary Tools and Materials
- Proper preparation prevents poor performance when filling cabinet hardware holes
- Having all tools and materials ready saves time and reduces frustration
- The right supplies ensure professional-looking results
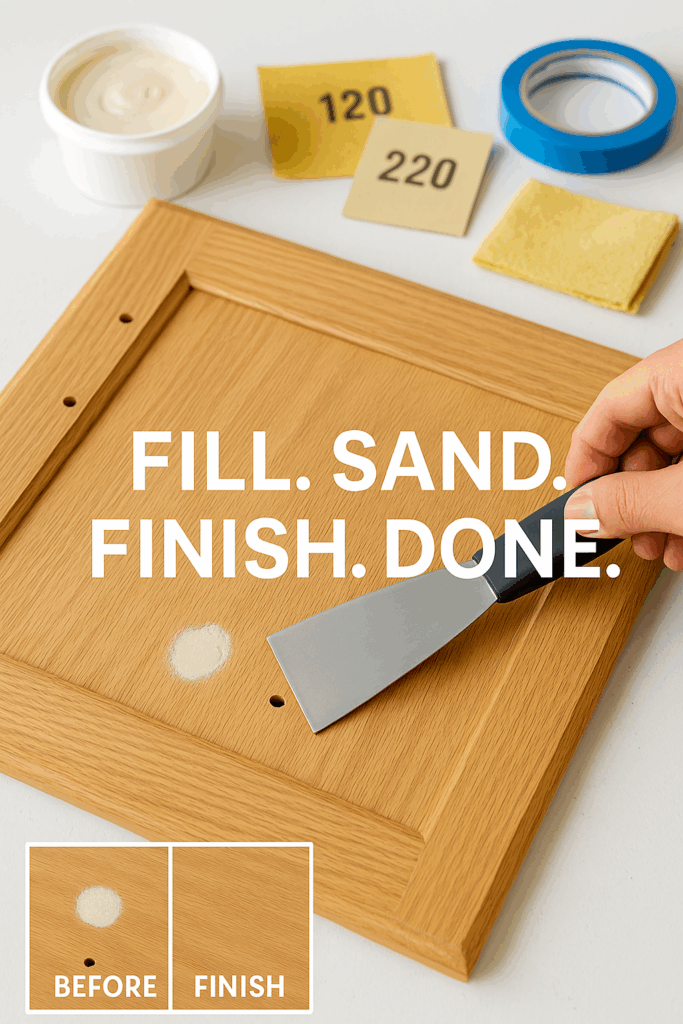
Before starting your cabinet hardware replacement project, gathering the correct tools and materials is essential. The success of your project depends on having everything you need within reach. Let’s break down what you’ll need to properly fill holes when changing cabinet hardware.
Essential Tools
- Screwdriver set (Phillips and flathead)
- Putty knife (1-2 inches wide, flexible metal)
- Sandpaper (120, 180, and 220-grit)
- Drill (if installing new hardware in different positions)
- Clean rags and brush
Materials You’ll Need
- Wood filler (stainable for wood cabinets, paintable for painted ones)
- Primer (for painted cabinets)
- Paint or stain (to match existing finish)
- Tack cloth (for dust removal)
Pro tip: For laminate cabinets, use epoxy putty instead of wood filler. For metal cabinets, choose auto body filler.

Step 2: Remove Existing Hardware
- Remove old hardware with the right tools to prevent cabinet damage
- Organize removed pieces systematically for possible reuse or reference
- Prepare the cabinet surface properly for the filling process
Removing existing cabinet hardware properly sets the foundation for a successful repair. This critical first step requires patience and the right technique to avoid damaging your cabinets. Rushed removal can create additional problems like stripped screws, scratched surfaces, or broken cabinet faces. Take your time during this phase! Careful removal now prevents costly repairs later.
- Use the correct screwdriver, turning counterclockwise.
- If screws stick, apply WD-40 to loosen.
- Cover pliers with masking tape if needed to grip hardware.
- Keep hardware organized and labeled if reusing.
Inspect cabinet surfaces for damage, sanding lightly around holes with 220-grit sandpaper to remove rough edges. Clean thoroughly with a damp cloth.
Step 3: How to Fill Cabinet Hardware Holes
- Wood filler is best for wooden cabinets, while metal/laminate cabinets need specific fillers
- Slightly overfill holes and allow proper drying time (typically 1-24 hours)
- Apply filler with proper technique for a smooth, seamless finish
The filling stage transforms empty holes into solid surfaces ready for finishing. Success here depends on choosing the right filler material for your specific cabinet type and applying it with proper technique. Different cabinet materials require different approaches; what works perfectly on solid wood may fail completely on laminate or metal surfaces. Getting this step right ensures your repairs will be strong, durable, and virtually invisible once finished.

Select Your Filler
- Wood cabinets: Stainable wood filler
- Painted cabinets: Standard wood filler
- Laminate cabinets: Epoxy putty designed for non-porous surfaces
- Metal cabinets: Auto body filler or metal-specific epoxy
Application Technique
- Clean holes one final time
- Apply filler slightly above the surface (about 1/8 inch)
- Press firmly into the hole using your putty knife
- Smooth the surface but don’t worry about perfection yet
For tube fillers: Insert the nozzle directly into the hole. Squeeze while slowly pulling out—this creates perfect fills every time.
Drying Guidelines
- Quick-setting fillers: 1 hour
- Standard wood fillers: 2-24 hours
- Check manufacturer instructions for specific times
- Test with gentle finger pressure—if it dents, wait longer
Important: Overfill slightly. Most fillers shrink as they dry.
Step 4: Sand Filled Areas
- Sanding creates a smooth surface that matches your cabinets perfectly
- Proper sanding technique prevents visible repairs when hardware is installed
- Careful dust removal ensures a flawless finish
Sanding transforms rough, obvious repairs into smooth, invisible fixes. This step separates amateur work from professional-quality results. Proper sanding technique creates a seamless transition between the filled area and your existing cabinet surface. Many DIYers rush through this crucial phase, but the time you invest in careful, progressive sanding directly determines how visible your repair will be once finished.

Progressive Sanding Method
- Start with 120-grit sandpaper to level the filler
- Switch to 180-grit to smooth the surface
- Finish with 220-grit for a paint-ready surface
Sanding Technique
- Sand with the grain on wood cabinets
- Use light pressure—let the paper do the work
- Check frequently by running your fingers over the area
- Stop when flush with the surrounding surface
Quality Check Methods
- Visual inspection: Look across the surface at cabinet level
- Touch test: Close your eyes and feel for imperfections
- Light test: Hold a flashlight at a low angle to reveal high or low spots
Remove All Dust
- Wipe with dry cloth to remove bulk dust
- Use tack cloth to pick up fine particles
- Final wipe with alcohol-dampened cloth
- Allow to dry completely
Step 5: Finishing Touches
- Apply the right finish to make filled holes invisible
- Create a professional look that matches your existing cabinets
- Protect your repairs with proper sealing techniques
The finishing phase makes your careful repair work completely disappear. Whether painted, stained, or clear-coated, this final step requires matching your existing cabinet finish perfectly. Poor finishing can make even expertly filled and sanded repairs obvious to anyone who looks. The right finish not only hides your repair work but also protects it from kitchen moisture, grease, and daily wear that could cause future problems.

For Painted Cabinets
- Apply primer to filled areas and slightly beyond
- Sand lightly with 220-grit after primer dries
- Remove dust with tack cloth
- Paint with matching color in thin, even coats
- Apply second coat after first coat dries
Color matching tip: Take a cabinet door to the paint store for exact matching.
For Stained Wood Cabinets
- Test stain on a hidden area first
- Apply stain with the grain using a clean cloth
- Wipe excess quickly to control color depth
- Allow to dry completely
- Apply clear protective finish
Pro technique: Mix sawdust from your cabinets with wood filler before applying for better grain matching.
Protective Clear Coat
- Choose appropriate finish: Polyurethane for durability, wax for traditional look
- Apply thin, even coats
- Sand lightly between coats with 320-grit paper
- Allow full cure time before installing hardware (24-72 hours)
Pro Tips for Perfect Results on Filling Holes When Replacing Cabinet Hardware
Once you’ve mastered the basic five-step process, these advanced techniques will elevate your work from good to exceptional. Professional cabinet installers use these methods to handle challenging situations and achieve flawless results that stand up to close inspection. Whether you’re dealing with difficult materials, want to avoid common pitfalls, or simply desire that extra level of perfection, these insider tips will help you work like a seasoned pro.

Advanced Techniques
- Wood plugs create more natural-looking repairs than filler on visible areas
- Drill-and-dowel method provides superior strength for heavy hardware
- Grain painting recreates wood patterns over filled areas
Avoid Common Mistakes
- Never rush drying time—patience prevents visible repairs
- Match materials properly—use wood filler on wood, epoxy on laminate
- Clean thoroughly—oils and debris prevent proper adhesion
Working with Difficult Materials
- Laminate cabinets: Seal exposed edges with super glue first
- Thermofoil cabinets: Use silicone caulk around holes before filling
- Metal cabinets: Roughen surface with sandpaper before applying filler
Final Installation
Once your finish fully cures:
- Mark new hardware positions using templates for consistency
- Drill pilot holes if needed
- Install new hardware with proper screws
- Check alignment across multiple cabinets
- Clean entire surface with appropriate cleaner
Conclusion: How to Fill Holes When Replacing Cabinet Hardware
Refreshing your cabinets with new hardware is a simple update that makes a big difference. By following these five steps—gathering the right tools, removing old hardware, filling holes properly, sanding carefully, and applying finishing touches—you can transform your kitchen without the cost of full cabinet replacement. Remember that patience during the filling and drying process is key to getting professional-looking results.
The skills you’ve learned aren’t just for cabinet hardware—they apply to furniture repair and other home projects too. If you encounter shrinkage or color matching issues, don’t worry. A second application of filler or testing colors on a hidden area first can solve most problems.
Take pride in mastering this practical skill that saves money and extends the life of your cabinets. Whether you’re updating your kitchen for personal enjoyment or preparing to sell your home, properly filled hardware holes make cabinets look well-maintained and cared for.
Ready to see your kitchen in a new light? Grab your putty knife and get started—your refreshed cabinets are just five steps away.


